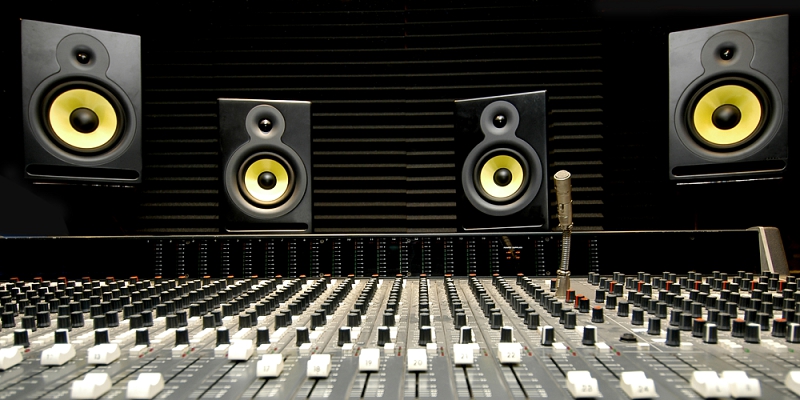
 Monitor speakers are absolutely crucial to the mixing process. Regardless of whether you spend hundreds or thousands on mid or top quality monitors, there’s one thing that can always prevent your monitor speakers from ever doing their job properly:
Improper placement.
Monitor speakers have to be placed correctly for optimal sound. If you don’t put the time into positioning your monitors then your perception of your music will be skewed from day one.
If you continue to produce with poorly placed monitors then you’ll simply screw up your mix.
Poorly placed monitor speakers could cost you hours in meticulous mix adjustments! It can be incredibly discouraging to discover that your music sounds completely different to how it sounded in your own studio.
Despite this, monitor speaker placement is probably the number one thing that new producers dismiss.
But just ask any pro producer – taking the time to place your monitor speakers is worth it!
The Issue of Poorly Placed Monitors
Sound is drastically affected by the room it’s played in – imagine placing monitor speakers in an echoey hallway or staircase and trying to mix there!
Your room affects your mixing choices through from compression and EQ to the mastering process.
There is a reason why professional studios require meticulous planning and are kitted out with tons of expensive sound absorption material – a ‘dead’ room with well-placed monitors allows you to hear your music as it really is, without acoustic interference.
In home studios, proper monitor replacement is arguably even more important than in professional studios. Home studios are often smaller and don’t benefit from treated walls or ample sound absorption material.
The Acoustic Effect of a Room
 Standing reflections: Standing reflections are what we frequently hear in corridors, staircases or other echoey chambers. When sound rebounds off a hard surface, it behaves much the same way as a bouncy ball – it reflects back the way it came and loses some energy in the process.
Standing reflections can interfere with each other, resulting in the cancellation of certain frequencies.
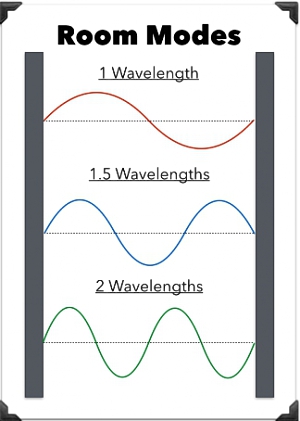
Resonant Frequencies. When you hum a low note, you may notice that your throat begins to vibrate. This is because you’re humming a resonant frequency – a frequency which resonates back and forth between surfaces in a 3D space. In a studio, this happens when a waveform is equal to or is divisible by the dimensions of a room.
E.g. a 200 Hz wave is roughly 5.7 ft in length so will resonate between walls equal to, half, or double 5.7 ft.
Resonant frequencies can persist for longer than standing reflections and may build in the corners of a room. The resonant characteristic of a room is called a “room mode”. In most studios, only low frequencies around 300 Hz or under tend to resonate and this can make bass particularly hard to mix.
Some results of poor monitor placement:
- Vastly exaggerated sub-bass with virtually no other low frequencies
- Weak bass in general
- Disappearing or weak high frequencies
- Bass that ‘escapes’ out of the room
- Strange resonance or echo effects
- Poor or altered stereo image
All of these things can distort the way you mix:
- You might overcompensate for bass cancellation to discover that your bass is loud and distorted when you play back your song on different systems.
- You might overcompensate for poor high-end to discover that your hi-hats and cymbals are ear-splittingly loud or distorted.
- You may meticulously widen every sound in the mix to discover that you’ve unnecessarily ruined your mix’s mono.
- You might turn down or remove some tracks altogether because of your false interpretation of the way they sound.
If you want to tighten up your monitoring and therefore the entire production process, read on for the 5 best tips on placing your monitors for optimum sound:
Top 5 Monitor Placement Tips for Optimal Sound
1. Be Aware of Hard Surfaces
First and foremost, never place your speakers directly on your desk. It’s an obvious one but don’t be tempted to skip this step…ever. Books won’t do either (though they are better than nothing). Invest in some foam speaker pads or stands.
When you’ve cleared your room, look around and take a note of any hard surfaces.
Hard surfaces tend to reflect sound in the same way that mirrors reflect light. Windows, thin hard walls, wooden desks, etc, are the worst offenders. When a sound rebounds off a hard surface back towards the speaker, it interferes with the sound emanating from the speaker itself and causes an effect called comb-filtering.
Comb-filtering is bad!
If you have the choice, do not position your speakers opposite hard surfaces. Windows are probably the worst of them all! Positioning your speakers to face your inside wall is usually the best bet.
DIY Tip: If you can, face you speakers towards the most absorptive wall in the room. If you’re in a bedroom then face the speakers towards the bed itself and push your mattress against the wall when you produce.
2. Avoid Placing Your Speakers too Close to Any Wall
 Whilst high frequencies tend to travel in a more uniform direction, low frequencies are more omnidirectional and actually disperse in all angles, including from behind the speaker.
If you place your speakers too close to any wall then sub-bass can become ‘trapped’ and build up into a nasty interfering rumble.
If your speakers are placed in the corners of a room then this effect can be accentuated even further. Play something bassy in an empty garage and listen from the corners, you’ll nearly always observe a weirdly exaggerated build-up of bass.
This is where bass-traps can provide huge benefits to your studio.
DIY Tip: The corners of your room are prime locations for sound absorption material. If you can’t get ahold of proper bass traps then stack cardboard boxes in the corners and fill them with soft objects or books. For comprehensive guidance on room treatment and absorption, check this guide.
In terms of monitor placement, try to create a generous space between the back wall and your speakers.
If your room is particularly small and you have no choice but to place your speakers right up against a wall then it’s even more important to invest in some good quality sound absorption material for behind the speakers.
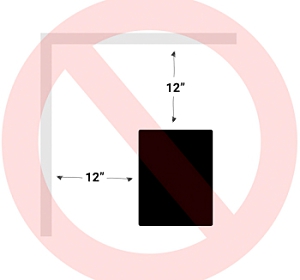
Also, ensure that the distances between your monitor and the two nearby walls are not the same. This will reduce the presence of low-end standing waves behind the monitors. See example below:
The good news is, the distance you need to allow for will usually be a couple of foot max for the largest monitor speakers. Check your monitor’s manual for guidelines on how far to position them from the wall.
3. Position Monitors in an Equilateral Triangle
This is probably the most important tip on the list. The triangle rule is often debated but for home studios, it’s best to place your speakers in an equilateral triangle with your head placed at the far corner. The further you need to position your speakers from each other, the further back you’ll need to position yourself.
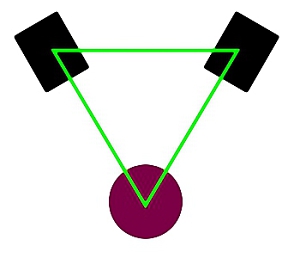
The objective is to line up your monitor’s tweeters with your actual ears. Often, this means that the third point of a triangle needs to be closer to the back of your head than the front.

4. Position Your Monitors at Ear Level
Positioning your speakers at ear level is particularly important for accurately monitoring high frequencies. Higher frequencies are more directional and thus, they travel straight out of the tweeter, more or less in a straight line.
If your speaker isn’t positioned at the right height, the highest frequencies will become noticeably weaker and you might overcompensate by turning these elements up in the mix itself.
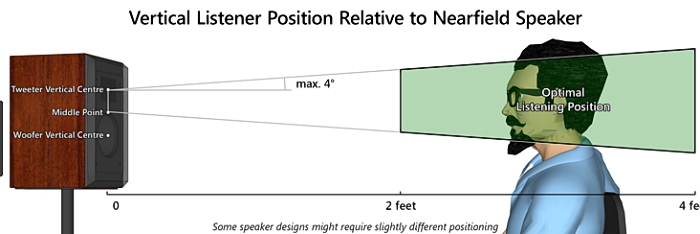
It’s best to look straightforward at the point between the woofer and tweeter. This example indicates that 2 feet or further is an optimal distance but this is a fairly large monitor speaker. You can safely position yourself closer to the monitor if you’re using 5” KRK Rokits or equivalent, so long as you adhere to the other rules.
5. Position Near the Correct Wall
 For accurate stereo imaging, it’s best to place your monitors equally between the two side walls. This will keep acoustic interactions from the side walls equal.
DIY Tip: If you can, place a large absorptive object directly in the middle of your room. Something like a big couch is ideal. This disrupts reflecting waves from both the back, front and sides of the room.
For optimal sound, there some other tricky caveats to adhere to when deciding where to place your monitors:
- Never position your head over halfway across the room. You want to be closest to the wall behind your speakers. If you position yourself too closely to the wall behind your head then you’re going to experience all sorts of issues resulting from comb-filtering.
Furthermore, never sit directly in the middle of the room – this is referred to as the “null zone” and causes nasty dips in bass response.
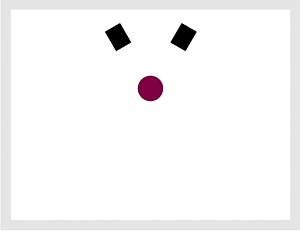
- In long narrow rooms, it’s best to position your monitor speakers closest to the shortest wall. This lengthens the distance sound has to travel to reflect off the back wall, reducing its volume and interference.
- In a rectangular room, where you can position your head beyond the room’s halfway point, it’d be best to place your monitors along the longest wall.
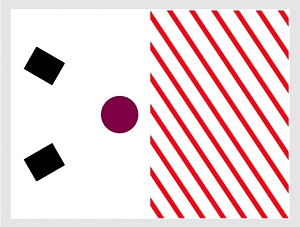
 Remember, you never want to position yourself exactly in the middle of the room. See the example below, you’ll notice that the person is neither positioned in the middle of the room nor across the room’s halfway point. In this scenario, it’s suitable to place your monitors across the longest wall.
- Always try and place your monitors either above or below the midpoint your room’s height. E.g. if the distance from the floor to ceiling is 8 ft then avoid placing your monitors near the 4 ft mark. Place them either higher, e.g. 5 ft, or lower. This will reduce the chances of comb filtering resulting from the floor and ceiling of the room.
Conclusion
Placing your monitors correctly might take some time and consideration but once you’ve done it, you can then focus on soundproofing your room to really squeeze the most out of it. Quality monitor placement combined with proper soundproofing will vastly improve the way you produce and mix your music.
You’ll be in the best place to make properly informed choices about your mix, saving you from the disheartening experience of realizing that your mix sounds completely different to your expectations!

